
The Problem – Not Enough Storage
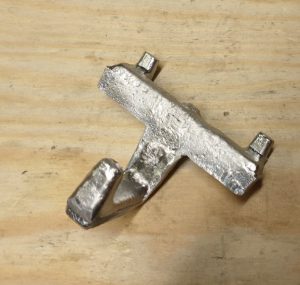
Patent Pending Hook for wire shelves. Prototype Industries 2025
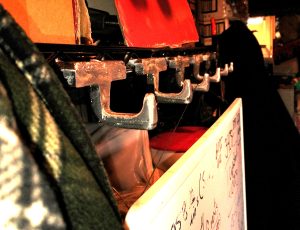
I bought these nice wire frame shelves and they work great for storing stuff like bulky items that are accessed every once in a while. But these shelves are just that, shelves.
The main problem with a shelf is that it really only has one role and that is to store bulky items. But ingenious people have discovered that the face of the shelf can be used for other items, such as doors, to hide the stuff, or even peg boards mounted on the doors to hang stuff.
And with these wire framed shelves, it would be really handy to hang stuff, especially in the basement. That extra jacket and hat, those ear muffs, even simple things like kneck lamps and tool belts. The basement is riddled with tools that need homes, and not every one of us has room on the wall for a peg board…because the shelf is covering it up.
So the hook concept was born.
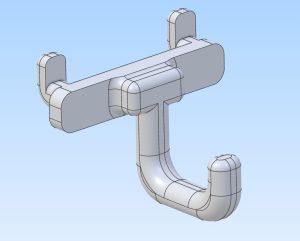
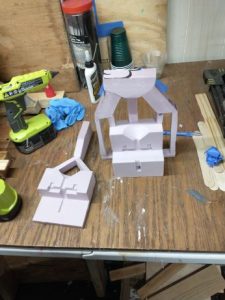
First CAD iteration of the Hook.
As with any project we do a full model of the wire rack and the hook was developed in CAD.
From there a 3-d printed model was made, and many were made, until….they broke.
The Achilles heal of 3d printed parts is strength. To get good strength you need to make the internal density really fine. That can take up to 6 hours for the print to complete. Even then it is not strong enough. You can change materials and go with nylon or even carbon fiber based FDM filament, but the costs and the time to make multiple parts is cost prohibitive, especially if you want to make enough to make a profit on them.
The Conundrum
The conundrum then is what do you do to make a small profit, without investing thousands of dollars in tooling and industrial commitment.
After all, we really just want to prove out the concept of the stronger part, and perhaps improve on it, so investing in tooling may be counterproductive, because we don’t even know if making it out of something more permanent, like aluminum is going to work the best. For example, maybe it is too light and falls out of the cradle too easily, the PLA versions do, maybe the aluminum version needs to be modified to be more permanent, but what if it doesn’t?
All these questions are valid, but the basic desire of having a stronger hook still has not been answered.
The Two Track Solution
The solution has a two track path. Choosing one or both tracks is an option which we started down the first path first, but decided against it to go down the more cost effective permanent path. The paths are:
- Sand Cast Tooling
- Permanent Mold Cast Tooling
From the surface the sand cast tooling looks like a promising candidate. The process involves designing tooling, 3d printing the mold masters, then over molding with silicone. The subsequent molds can then be easily filled with sand, the final molds assembled, and then used one time to make one part. The sand molds take about 25 minutes to make and only yield one part per cycle.
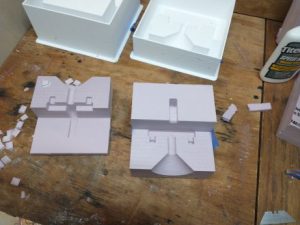
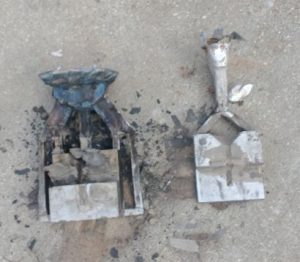
Two Methods of casting. The white 3d printed mold halves are for the sand casting method. The Foam pieces are machined foam being readied for permanent mold casting or die casting.
That gets expensive in time as we will see in a minute. The overall cycle time for a sand cast part is around 1 hour, at $100/ hour that is a pretty expensive hook.
There must be a better way then, because you and I know the hook really is only worth 3 hooks for around $10, that’s the target MSRP. Any higher is a losing proposition.
The Better Way
Another method that can get the price down, is permanent tooling, or hard tooling.
Our Research Has Shown…
We at Prototype Industries have performed extensive research into molding aluminum different ways and the issue really is that aluminum is so hot, its temperature gets high enough that any “cheat ways” just cannot hold up. For example we tried a high temperature silicone on zinc, which has a lower melting temperature than aluminum. We figured that if we could at least cast using this high temperature silicone, perhaps it would open some rapid prototyping doors open for us.
But, no, the silicone degraded and melted, not horribly, but badly enough that we only got one part off the mold. The best we can do quickly, i.e. within one hour, is to use sand bound together with urethane or sodium silicate.
Urethane tends to bind the sand together quite well even under molding conditions. It will melt away after the aluminum is cast, but the initial wave of aluminum will stay in its shape, and then the urethane sand will cook away.
Sodium silicate has the opposite effect, it gets harder when the aluminum hits it, making the sand cling to the parts when cast. This can be mitigated with sprays, however. The problem with sodium silicate is that it takes forever to set, and does not have the overall wall strength that urethane has.
Permanent Tool Casting The Faster Way
The other way to cast aluminum is to make the tool either out of steel, cast iron or believe it or not, aluminum.
You would think the aluminum would either melt or just adhere to the aluminum that was being cast. The latter is actually a problem if the surface of the mold is not treated properly, the parts will get stuck to the aluminum mold. However, modern foundry methods have figured out how to keep aluminum parts from sticking to aluminum or even steel molds with spray on release agents.
The spray on release agent is really just graphite that is emulsified and sticks to the surface of the mold quite well. The parts when designed properly draft and the understanding of how the part shrinks (or wants to stay bound on the tool) will come out freely.
Welcome To The Fast Tracked Hook
The permanent tool when looked at from a time stand point can put out around 20 parts an hour, with a single person working at pouring and pulling parts. At $100/ an hour that’s about 5$ in labor per part. That’s not bad for a prototype process. If a two up tool were made the cost could be halved.
The process to make a permanent mold can be performed using the same mold designs that were designed for sand casting. The only difference is that the mold development does not use silicone rubber, but foam.
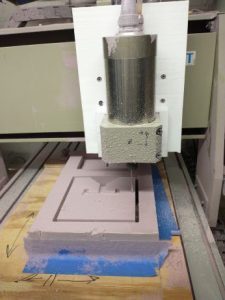
The foam blanks are machined using a CNC router. Then molds are final prepped by gluing the sections together and gluing gates and risers to the final assemblies.
The resultant form is then coated with refractory material. This takes about two days to properly dry.
Then the form is immersed in foundry sand. The sand is then vibrated intensively to get the sand to pack into the whole part area. Sometimes the voids underneath cannot be filled properly so sand cores essentially are packed into the part before it is immersed in sand to make sure the part full casts properly.
The form is then cast. The foam is burnt away in the action of casting.
The part is then de-sanded and the resultant mold is fine finished using sanders and polishers. The molds is then prepped for casting by coating it with mold release agent.
The mold halves are then clamped together, the parts are poured, and then less than 15 seconds later, the mold can be opened up, and de-molded. The mold can be clamped together again and the cycle begins again.
Developing this tool, takes a little longer in prep time, however the overall cost savings in part cost is seen when making parts, because the cycle time is so much faster.
The tools can last indefinitely and the demand of large amount of parts is not an issue, 1 or 100 parts can be made, just depends on how many you want to make in a sitting. Then the tool is stored for another order.
At Prototype Industries we use this method for frequently ordered parts through out the year. The orders may be small, however the set up time for making sand molds is eliminated and very often a large time savings can be realized.
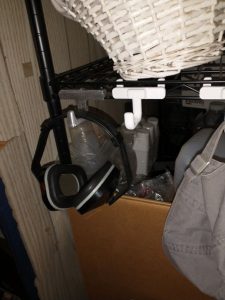
The two hooks side by side. The original 3-D printed version, that can take light loads and the aluminum version with the Ear Muffs.
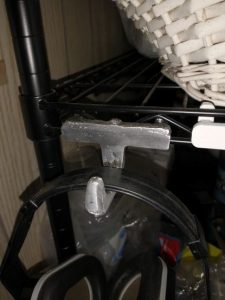
Close up of the ear muffs and the hook.