
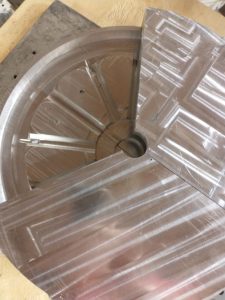
Machined Cavities being test assembled
By Robert Gamble
If you frequent our site you may see that we do some pretty wild things, ranging from complex sand castings, interesting hollow urethane castings to simple run of the mill lapel pins (for the wife of course!)
Well over the past month we have been designing, planning, setting up CNC-cut scenarios, re-planning…biting the lower lip and purchasing big blocks of Aluminum from Speedy Metals and then finally getting warmed up to the CNC machine, breaking a bit or two, and then cutting real authentic, viable, tangible chips.
The process has been methodical and thoughtful because we want this to work. Just what is THIS?
A solid mold for casting up wheels. The main reason for this jump to a solid mold is to stream line the production process and also to improve quality.
I have high hopes for this project, however, to keep my enthusiasm at bay, realistic expectation are required, in engineering speak we call that: risk assessment. In a more clear way of saying it from a layman’s standpoint “what could possibly go wrong?!” It is one of the more painful aspects of engineering, as I tell people about what I am good at “I make stuff, and break stuff.”
This project could have these elements so I like to put them in bullet points so that they can be addressed directly:
- Excessive shrinkage in the central hub
- Failure to release from the tool (not enough draft, or polish on tool surfaces)
- Failure to fill fully (tool is too cold)
- Failure to fill in all areas with potentials for air voids (ie bubble pockets – sand molds do not have this problem, as the sand vents the gases)
The second on the list is pretty frightening. As typically when the tool is first cast, it will not release from the tool. This is where good surface finish, or at least good mold release is required to make sure the part will release.
When a part cools it contracts, and so it will tend to lock down on the mold surface. This is where draft helps in releasing from the mold. In essence it make a ramp, or wedge that helps naturally release the part from the mold. Draft was introduced into this design to help maximize this effect.
The other items on the list rate a little lower as far as drastictness is concerned, as they are more cosmetic. The excessive shrink has more to do with where the shrink is starting after the pour. In this case, past pours using sand casting have the shrink starting in the riser – filler. The center of the filler shrinks down and promulgates the wave of cooling effectively. (Because we do not have access to a filler program, we are relying on “old school techniques” of essentially statistical comparison – or if it worked there, is should work here.)
Keeping the tool hot, as in boiling hot 200 deg F, is essential in keeping the aluminum from shunting off and cooling right away. We want a liquid metal wave for the whole fill and then a gradual cool down. This is where the natural cooling effect of the aluminum cavity helps in dissappating heat. The expected cool down time is around 15 minutes, before pulling the part (that may actually be a long time to wait – we will see.)
Here is where we are at the moment: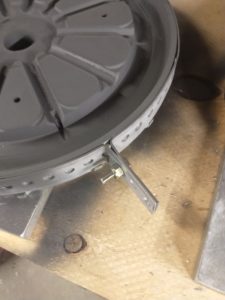
Circular clamps on the upper and lower sections of the cavities.
Good layer of mold release coating made out of graphite powder.
This article is the pre-assessement, before pouring, or our pre-launch preparations!
More to come…