
By Robert Gamble
The large thin center part, the light bar, proved to be a tough design to make….
I have been working in the product development industry for over 30 years and in that time I have developed over 40 outstanding products along with over 25 patents that provide a special corner and niche in the market.
That being said, I have seen a lot of different ways to do things and develop things.
I use the process of “pushing the envelope”.
The term pushing the envelope was coined by Tom Wolfe in the book called “The Right Stuff,” a book about the X-15 and the men involved to actually fly these rocket planes. Pushing how fast and how high the plane could go were the aims of this project. The X-15 project had many fruitful areas of research in aerodynamics and atmosphere limitations.
We’ve heard the phrase “How much can she take?” Or as Scotty from Star Trek says “I’m givin’ her 110% captain! I can’t give much more!”
You’ve probably seen awe inspiring videos of wings in test rigs being pushed to the limit and then snapping in a sudden release as the fixture let go and the wing shattered spectacularly.
The limits of what things can take is where I live: I’m a very successful engineer and knowing the limits, knowing how far I can push the envelope, is what gets the products innovated, the ideas exculpated out, and the new markets pushed out there to solve the next problem for customers.
The concept of pushing the product to its limits applies also to many other areas. In fact, it has a process. And that process can be pushed to be more efficient, faster, and better able to handle the day in and day out use (durability).
In this article we will be discussing several ways that “we push the envelope” to get a prototype, a pre-production run, in your hands in a timely manner. The bottom line in manufacturing environments is cost. Is the system profitable or does it just break even, or barely cover the costs?
The limits of the envelope are what dictates how far we can push the system.
In the rapid prototype processes that we use, we develop products in the following ways:
1. Simple Modeling
2. Simple Prototypes
3. Simple Tests
You notice the word “simple.” That is key in keeping the clutter in the design to a minimum. What are the basic design elements of this system?
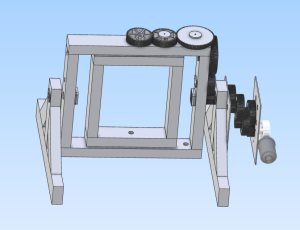
I’m reminded of an example that involved rotational molding machines, my 16 year old son and Legos!
Simple Modeling – With Simple Tools
I was driven to make a rotational molding machine that would fit in a small space, and I tasked my 16 year old son to develop a simple model out of Legos so I could “see” the system moving and understand it quickly.
A rotational molding machine seems really complicated at first glance. It has multi-spinning axis and it really can be a head-scratcher at what is happening when seeing it. That being said it can be a head-scratcher as to how to get the whole contraption to articulate and actually function.
Software has come a long way, however, even as a I write this, designing this concept in CAD is still a challenge, a simple model, however developed by a 16 year old in less than an half hour, gave me a visual that was needed to go ahead and start developing the whole model in CAD.
As it turned out all the parts were 3-D printed and made identical (Simple prototypes), so that one part could be used in multiple areas. A simple windshield motor was used to run the whole system.
Simple Testing – With Simple Parts
 The simple testing then began. One of our frequently ordered products is for the movie industry and that involves making hollow parts out of urethane. A rotor molder essentially rotates a mold shape in all directions to keep the material flowing in a continuous flow pattern on the outer edges of the part. The part is uniformly filled out using this method, but is not solid, as being solid would be a waste of material, and obviously way too heavy.
The machine has run for over ten years with basic simple adjustments and part replacements. Because the gears are made out of urethane and 3d printed parts repairs can be made in minutes, not days.
Pushing the envelope can be shown with this simple molding machine. First the machine was needed. The issue is that a large machine, which we have, eats up a lot of real-estate, or has a big foot print. Additionally the limitation to rotation-ally molding Urethane parts is that once the part is filled, rotation must commence immediately, or the parts are ruined. There is no waiting for material to be queued and then put in a furnace, like the big brother units used in Thermal Rotational Molding. The dynamics are similar, but that is where the similarities end.
Rotational Molded Part Finished on New Machine
Urethane-Rotational molding has a 15 minute cycle time, so when the machine is running, there is potentially down time. To solve this down time, other jobs can be thrown in the mix, to make every minute profitable. What jobs to put in the down time, is the main problem. So adding extra rotational molding machines works well, because the cycles can be interwoven to maximize productivity. Hence the birth of a second rotational molding machine…from scraps in the garage…in less than a week (okay, okay we’ve heard that one before….).
In industry you can see the push for automation as it takes away the human element and makes for a more efficient process. The unseen, however, is the set up time. How long does it take to get the automation up and running? Automation may be an excellent solution for a long term project, but poor solution for short term projects.
You will see for example that the time gap for short term projects is being lessened as more and more companies are using quick tool changers, and simplified tool holding, or even modular tooling as a way to quickly serve customers.
We here at Prototype Industries use similar approaches to developed products. How can we make them efficiently at the low runs that small batch orders require?
The Intuitive Method of Identifying Problems in Process
This may sound trivial, but I use the groan method. Whaat?
Exactly, if I groan every time a job comes up, then something is up with that project. The groan is from wasted time, wasted resources. If at the end of the day you said “Well that was a wasted day” then something was up with the process, it must be inefficient.
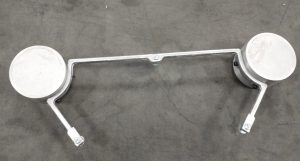
One prime example of that is the Light Bar.
The light bar is a feature on a 1/2 scale Model T Go kart that holds the light cans to the front radiator of the car. The original light bar is made out of formed tubing. The light bar has its limitations in that is bends and rusts. Often enough they are just plain broken.
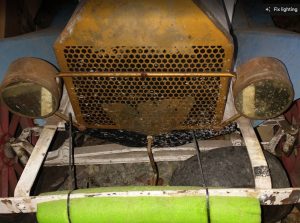
Original Steel Light Bar in place on Model T Go Kart
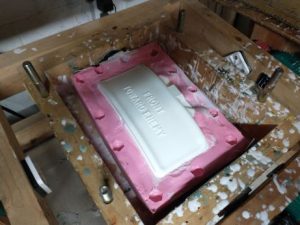
A cast light bar was developed that is quite rigid, can handle vibrations and will not rust away. Making the light bar has been a challenge, because it is a long gangly thin casting.
The part being long made developing the original simple examples challenging. The method of tooling that is used by our shop has an element of flexation that can cause misalignment if the mold is not held rigid. Holding the mold rigid can be accomplished in numerous ways, all of which were explored, however the best way came by just throwing mass at it. That simply means, don’t let it flex with large amount of area.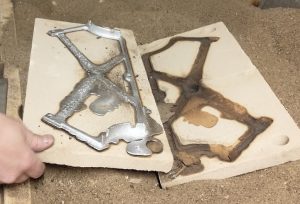
The downside to that solution is that it wastes material. That is 17 pounds of sand are required to make the mold reliable and parts uniform. Resources consumed, staging area eaten and the long cycle time all add to the groans of producing this once in a while ordered part. To develop 10 parts it would take 170 pounds of sand, 8.5 pounds of binder, and 5 hours of time.
A better more efficient way is needed, that is where hard tooling comes into play. Because the margins on the product are so low, developing cost effective hard tooling is a challenge, or pushes the envelope on tooling design:
– Simple Tool Development.
– Simple Process.
If you have read the article on “From Picture to Product in Less Than a Week Using Scraps in a Cave”, you will see that simple tools were developed to make many simple products in a matter of days. The same process was followed to develop a light bar so that costs were cut, time was saved as the process pushed the limits, or the envelope of what can actually be made accurately and repeatedly on a small order basis.
If you have a project you are working with and need help getting the process in line, be sure to contact us and see how we can help. Our vast experiences in the product development space, from both mechanical an electrical may prove to be what you are looking for.